Stud weld inspection is not optional on structural projects — it is a code requirement. AWS D1.1, the Structural Welding Code for Steel, mandates 100% visual inspection of every installed stud on any certified structural application. Yet many project teams treat inspection as an afterthought, catching problems only after a pour has started or a failed certification check halts production. This guide gives fabricators, project managers, and quality inspectors a clear, practical framework for stud weld inspection — what to check, how to test, and what each result tells you. Northland Fastening Systems provides the products that support every stage of this process.
Why Stud Weld Inspection Matters More Than Most Teams Realize
A stud weld that looks acceptable on the surface can still fail under load. Incomplete fusion, an undersized flash ring, or off-center plunge all reduce the effective bond area of the connection — without producing a visible crack or obvious defect. Furthermore, a failed stud on a composite floor system or bridge deck does not simply weaken one point. It transfers additional load to adjacent connections and accelerates fatigue damage across the entire system.
AWS D1.1 Section 7 specifically governs stud welding requirements for structural steel applications. Consequently, inspectors on certified projects must understand both the visual and mechanical testing criteria the code requires — and apply them consistently across every weld on the program. Northland Fastening Systems provides stud welding equipment and fastening solutions designed to support consistent, reliable connections in demanding structural applications.
Step 1: Visual Inspection — The First and Most Important Check
Visual inspection is the first line of quality control and AWS D1.1 requires it on 100% of installed studs. Carry out visual inspection immediately after removing the ceramic ferrule from each weld.
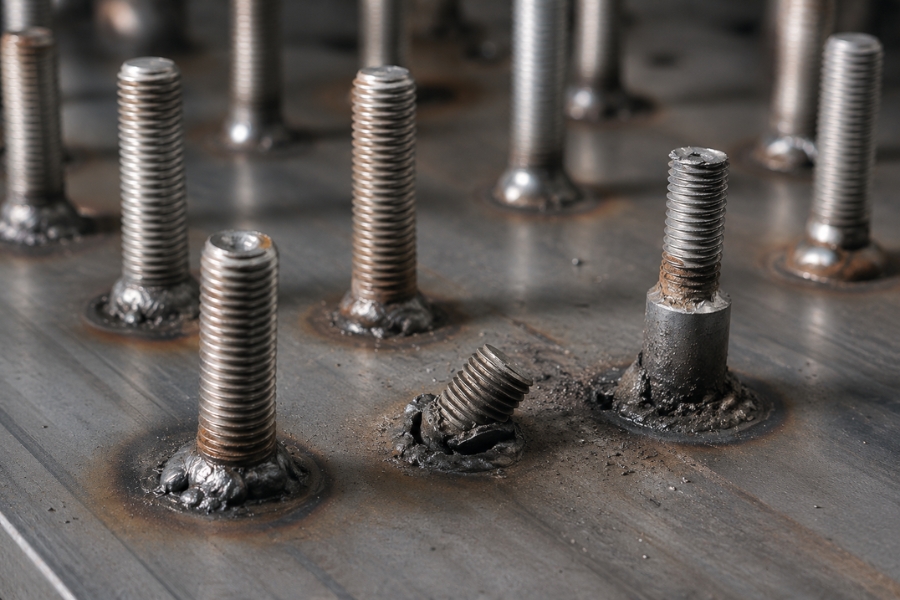
What a passing weld looks like: A correctly executed stud weld produces a complete, continuous flash ring — also called a fillet — around the entire base of the stud. This flash ring confirms that the base metal and stud both reached full fusion temperature and that the plunge was centered and consistent.
What to look for and what it means:
| Visual Finding | What It Indicates | Action Required |
|---|---|---|
| Complete 360° flash ring | Full fusion achieved — weld passes visual inspection | No action required |
| Incomplete flash — partial gap | Insufficient energy or off-center plunge | Bend test required in direction of missing flash |
| No flash ring visible | Severe underfusion — weld did not complete correctly | Remove and replace stud |
| Shiny weld base / no discoloration | Arc did not sustain long enough for proper fusion | Check machine parameters and retest |
| Excessive spatter or porosity | Contamination on base metal surface or wrong ferrule | Investigate cause before continuing production |
| Undercut at stud base | Excessive arc energy or incorrect lift height | Adjust parameters and retest |
A 360° flash ring is the visual confirmation of a sound weld. If any gap appears in the flash, AWS D1.1 requires that the bend test be performed in the direction of the missing flash before the stud is accepted.
Step 2: Bend Testing — The Field Mechanical Test
Bend testing is the primary mechanical verification method for stud welds on structural projects. AWS D1.1 requires bend testing when visual inspection is inconclusive, when a stud fails to exhibit a complete 360° flash ring, or as part of pre-production qualification testing.
How to perform the bend test correctly:
Apply force to the stud using a steel pipe or hammer to bend it approximately 30 degrees from its original axis. Bend in the direction of any incomplete flash if a partial ring is present. Inspect the weld zone and heat-affected zone (HAZ) carefully after bending.
Passing result: No fracture or cracking appears in the weld zone or HAZ. The stud bends without separation from the base metal. This confirms full fusion and adequate ductility in the weld.
Failing result: The stud separates at the weld zone or shows cracking in the HAZ. This indicates insufficient fusion depth, contamination in the weld pool, or incorrect welding parameters on the machine.
If a stud fails the bend test, AWS D1.1 requires that the procedure be corrected and two additional studs welded and tested successfully before production continues. Importantly, do not simply re-weld over a failed stud without first checking and correcting the machine amperage and arc duration settings. The root cause is almost always a parameter error — not an isolated bad weld.
Step 3: Torque Testing — For Threaded Studs
Threaded studs require torque testing rather than bend testing. AWS D1.1 specifies minimum torque values based on stud diameter and thread type. Apply the torque with a calibrated torque wrench and confirm the stud holds the required value without rotation or base separation.
Torque testing confirms that the weld can transfer the mechanical load the threaded connection is designed to carry. It is particularly important on equipment mounting frames, bracket assemblies, and structural connections where the threaded interface carries both tension and shear loads.
Step 4: Pre-Production Testing — Before the Job Starts
AWS D1.1 requires pre-production testing before any production stud welding begins on a new program. The operator must weld two test studs to representative base material and pass both visual inspection and the appropriate mechanical test before welding production studs.
This step protects the entire program. It confirms that the machine parameters, stud type, ferrule selection, and base material preparation all work together to produce a compliant weld under actual job conditions. Correct stud welding accessories — specifically the right ferrule type and diameter for the stud being used — are critical at this stage. A mismatched ferrule produces an incomplete flash ring on every weld, regardless of how correctly the machine is set.
What Causes Stud Welds to Fail Inspection
Most stud weld inspection failures trace back to one of four root causes:
Incorrect machine parameters — Wrong amperage or arc duration for the stud diameter produces insufficient heat at the weld zone. Always set parameters to the stud manufacturer’s specification and confirm on test welds before production.
Contaminated base metal — Mill scale, rust, moisture, paint, or galvanizing on the base metal surface disrupts the arc and prevents full fusion. Clean the weld area with a wire brush and confirm it is dry and free of coatings before welding.
Wrong ferrule selection — A ferrule that does not match the stud diameter fails to contain the weld pool correctly and produces an irregular, incomplete flash ring. Confirm ferrule type and diameter against the stud specification on every order.
Worn or damaged accessories — A worn chuck allows stud movement during the arc phase, producing an off-center plunge and asymmetric flash ring. Similarly, corroded cable connectors reduce arc energy and cause underfusion. Inspect all accessories at the start of every shift.
Sourcing quality arc studs from a certified supplier with AWS-compliant materials eliminates material variability as a failure cause — ensuring the stud itself is never the weak point in the inspection equation.
Source Inspection-Ready Stud Welding Supplies from Northland Fastening Systems
Every stud weld inspection outcome depends on the quality of the products used to make the weld. Northland Fastening Systems supplies AWS D1.1-compliant arc studs, ceramic ferrules, chucks, cable accessories, and all standard stud welding equipment for structural and industrial projects. Full material certification documentation is available on every structural order — ready for your quality team on request.
Call us at 651-730-7770 to speak with a product specialist today. We confirm specifications, match products to your project requirements, and make sure every order ships with the documentation your inspection process demands.